Thread
Android : Passing data between main thread and worker threads.
There may be situations where you want to spawn a
thread from your Activity or Service to handle long running (and may
be blocking) tasks. In such cases, its sometimes necessary to pass
data back and forth between the main thread and the worker
thread(s). E.g. if the worker thread finishes a task and returns the
result to the main activity to display the results OR you want to
keep a worker thread around and ask it to switch between tasks
depending on some message you pass to it.
In the past, I faced some problems understanding these concepts associated with different classes in android.os like the Handler, Looper, HandlerThread etc...
I'll try to explain these concepts in a simple language. Probably most of these explanations are from the developer documentation, but I thought consolidating these at one place may help to get a good picture.
Ok. So, when an application runs, it runs in a Main thread called as the UI thread. Any other thread can be created using the standard java.lang.Thread class. As I said in a typical situation you will spawn a thread, may be pass some data to it OR the thread may pass back some data to the Main thread from time to time as well as when its done executing.
Let us consider the task where we need to send data to a worker thread. So first, we create a worker thread.
STEP 1: Create a worker thread
class MyThread extends Thread {
@Override
public void run(){
}
}
In our main thread...
MyThread mThread = new MyThread();
mThread.start();
When you have to pass any messages to a thread or get messages from a thread, the receiving thread needs a MessageQueue. By default, a thread created by using the java.lang.Thread class will not have a MessageQueue associated with it. Its just a plain old thread as in the Fig. 1 (Yes, I know. What an innovative diagram !! :D ).
Now, we need to attach a MessageQueue to our thread. The Looper class provides the method prepare() to create a message queue for a thread. We need to call this method from the receiving thread's run method.
In the past, I faced some problems understanding these concepts associated with different classes in android.os like the Handler, Looper, HandlerThread etc...
I'll try to explain these concepts in a simple language. Probably most of these explanations are from the developer documentation, but I thought consolidating these at one place may help to get a good picture.
Ok. So, when an application runs, it runs in a Main thread called as the UI thread. Any other thread can be created using the standard java.lang.Thread class. As I said in a typical situation you will spawn a thread, may be pass some data to it OR the thread may pass back some data to the Main thread from time to time as well as when its done executing.
Let us consider the task where we need to send data to a worker thread. So first, we create a worker thread.
STEP 1: Create a worker thread
class MyThread extends Thread {
@Override
public void run(){
}
}
In our main thread...
MyThread mThread = new MyThread();
mThread.start();
When you have to pass any messages to a thread or get messages from a thread, the receiving thread needs a MessageQueue. By default, a thread created by using the java.lang.Thread class will not have a MessageQueue associated with it. Its just a plain old thread as in the Fig. 1 (Yes, I know. What an innovative diagram !! :D ).

Now, we need to attach a MessageQueue to our thread. The Looper class provides the method prepare() to create a message queue for a thread. We need to call this method from the receiving thread's run method.
STEP 2: Call the Looper
methods
class
MyThread extends Thread {
@Override
public
void run(){
Looper.prepare();
Looper.loop();
}
}
As you see, there is one
more Looper method called in the code. This loop() method will start
running the message loop for the current thread. In simple terms, it
will start looking at the MessageQueue and processing the messages.
This is how I interpret the Looper as in Fig. 2.

But, who sends the messages
to the MessageQueue and how are these processed ? There is a class
called the Handler.
The Hander allows us to send and process Messages
(as well as Runnable Objects) associated with the thread's
MessageQueue. So, we need to create a Handler. It is important to
note that the Handler is associated with the thread that creates it
! The Handler provides methods to handle (receive) Messages as
well as send and schedule messages. For details, please refer to
documentation.
STEP 3: Create a Handler
to receive the Messages
class
MyThread extends Thread {
public
Handler mHandler;
@Override
public
void run(){
Looper.prepare();
mHandler
= new Handler() {
public
void handleMessage(Message msg) {
//
Act on the message
}
};
Looper.loop();
}
}
If you notice, this code is
the same that is listed on the Looper documentation page
here.
Few things to mention here are. The Handler is created in this
thread, hence it is associated with the default Looper (read
MessageQueue) in the current thread. There are constructors for the
Handler that allow us to specify the Looper (again, read
MessageQueue). This allows us to write a cleaner code by writing the
Handler class separately and passing on a Looper (again, again,
read MessageQueue) when the Handler is created. I'll get to
this in a while. But as I have insisted, it is worth noting that
whenever the developer documentation refers to a Looper, you can
assume they are talking about a queue. I'm really not sure why they
have surfaced the Looper class. It creates more confusion (at least
for me). Also, when dealing with passing the messages, with this
mechanism, we really need not care of the MessageQueue call. That is
the reason I haven't linked it to the documentation. Anyways...
things are what they are ! For me, I like to interpret this whole
mechanism as depicted in Fig. 3.

Let me know if you like PAT
or your way of viewing it !
So, now any other thread
having the reference to mHandler will be able to call the send or
post methods of the Handler class to send a Message (or a runnable
object) to our thread. The code for sending message will look like:
Message
msg = Message.obtain();
msg.obj
= // Some Arbitrary object
mHandler.sendMessage(msg);
Pretty simple yeah ! Btw,
there are various methods to set/get data for the Message object
which can be found in the developer documentation for the Message
class.
Summary of Steps :
1. Create a Handler in the
receiving thread [If it is the main thread, create one in the main
thread]. By default the handler will be associated with the default
queue (Looper).
2. So, if the receiving
thread is created by using java.lang.Thread, then we need to call
the Looper.prepare() and Looper.loop() in order to set up the
message queue for the thread.
3. In the sending
thread, prepare a message object (or a Runnable object)
4. Get a reference to the
Handler in the sending thread and call the send/post methods on it
to send a message.
HandlerThread:
Since by default
java.lang.Thread doesn't contain a message queue (Looper), Android
provides a class called as the HandlerThread which already contains
a message queue. The only difference in using the HandlerThread
class over the method described above is that you need not call the
Looper.* methods.
On creation of a
HandlerThread, Android will create a thread containing the looper.
So, in the main thread the code will look like:
HandlerThread
myThread = new HandlerThread("Worker Thread");
myThread.start();
We separately create a
Handler as follows:
class
MyHandler extends Handler {
public
MyHandler(Looper myLooper) {
super(myLooper);
}
public void handleMessage(Message msg) {
}
public void handleMessage(Message msg) {
}
}
}
Now in the main thread, we
get the looper for the HandlerThread and pass it when we create the
Handler as follows:
Looper
mLooper = myThread.getLooper();
MyHandler
mHandler = new MyHandler(mServiceLooper);
Whenever we want to send a
message from the main thread, we do it in a similar fashion.
Message
msg = mHandler.obtainMessage();
msg.obj
= // Some Arbitrary object
mHandler.sendMessage(msg);
I
like to visualize this as shown below in Fig. 4 where we write the
Handler separately and then pass a looper to it on its creation.

Android runnable example
Update TextView by runnable. Handler, runnable, timer Android example.public class TimerActivity extends Activity { TextView hTextView; Button hButton, hButtonStop; private Handler mHandler = new Handler(); private int nCounter = 0; @Override public void onCreate(Bundle savedInstanceState) { super.onCreate(savedInstanceState); setContentView(R.layout.main); hTextView = (TextView)findViewById(R.id.idTextView); hButton = (Button)findViewById(R.id.idButton); hButton.setOnClickListener(mButtonStartListener); hButtonStop = (Button)findViewById(R.id.idButtonStop); hButtonStop.setOnClickListener(mButtonStopListener); } // end onCreate View.OnClickListener mButtonStartListener = new OnClickListener() { public void onClick(View v) { try { mHandler.removeCallbacks(hMyTimeTask); // Parameters // r The Runnable that will be executed. // delayMillis The delay (in milliseconds) until the Runnable will be executed. mHandler.postDelayed(hMyTimeTask, 1000); // delay 1 second } catch (Exception e) { // TODO Auto-generated catch block e.printStackTrace(); } } }; private Runnable hMyTimeTask = new Runnable() { public void run() { nCounter++; hTextView.setText("Hallo from thread counter: " + nCounter); } }; /** * */ View.OnClickListener mButtonStopListener = new OnClickListener() { public void onClick(View v) { mHandler.removeCallbacks(hMyTimeTask); } }; }main.xml
<?xml version="1.0" encoding="utf-8"?>
<LinearLayout xmlns:android="http://schemas.android.com/apk/res/android"
    android:orientation="vertical"
    android:layout_width="fill_parent"
    android:layout_height="fill_parent"
    >
<TextView
        android:id="@+id/idTextView"
    android:layout_width="fill_parent"
    android:layout_height="wrap_content"
    android:text="@string/hello"
    />
<Button android:text="Button"
android:id="@+id/idButton"
android:layout_width="wrap_content"
android:layout_height="wrap_content"></Button>

 <Button android:layout_width="wrap_content"
 android:layout_height="wrap_content"
 android:id="@+id/idButtonStop"
 android:text="Stop"></Button>


</LinearLayout>
1. Android Threads and Background Processing
Android modifies the user interface via one thread, the user interface thread. If the programmer does not use any concurrency constructs, all code of an Android application runs in this thread.If you perform a long lasting operation, e.g. loading an file from the Internet, the user interface of your Android Application will block until the corresonding code has finished.
To provide a good user experience all potentially slow running operations in an Android application should run asynchronously, e.g. via some way of concurrency constructs of the Java language or the Android framework. This includes all potential slow operations, like network, file and database access and complex calculations.
Android enforced that with an "Application not responding" (ANR) dialog if an
Activity does not
react within 5 seconds to user input. From this dialog the user can
choose to stop the application.
2. Android Basics
The following assumes that you have already basic knowledge in Android development. Please check the Android development tutorial to learn the basics.3. Background Processing
3.1. Threads
Android supports the usage of theThreads
class to perform asynchronous processing.
Android also supplies the
java.util.concurrent
package to perform something in the background, e.g. using the
ThreadPools and Executor
classes.
Only the user interface face is allow to update the user interface. If you need to update the user interface from another
Thread, you need to synchronize with
this user interface Threads. You can use
the class "android.os.Handler" for this or the class
"AsyncTasks".
3.2. Handler
TheHandler class can update the user
interface. A Handler provides methods
for receiving instances of the Message
or Runnable class.
To use a handler you have to subclass it and override the
handleMessage() to process messages. To
process a Runnable you can use the
post() method. You only need one
instance of a Handler in your Activity.
You thread can post messages via the
sendMessage(Message
msg)
method or via the sendEmptyMessage()
method.
3.3. AsyncTask
The class AsyncTask encapsulates the creation of Threads and Handlers. You must implement the method "doInBackground()", which defines what action should be done in the background. This method is be automatically run in a separate Thread. To update the UI you can override the method "onPostExecute()". This method will be called by the framework once your action is done and runs within the UI thread. AsyncTaskTo use AsyncTask you must subclass it. AsyncTask uses generics and varargs.The parameters are the following AsyncTask <TypeOfVarArgParams , ProgressValue , ResultValue> . TypeOfVarArgParams is passed into the doInBackground(), ProgressValueis used for progress information and ResultValue must be returned from doInBackground() and is passed to onPostExecute() as parameter.
3.4. Feedback via ProgressBar
For providing feedback to the user you can use theProgressBar
dialog, which allow to display progress to the user. The Javadoc of
"ProgressBar" gives a nice example of its usage.
Alternatively you can provide progress feedback in the activities title bar.
3.5. Concurrency and lifecyle
One challenge in using threads is to consider the lifecycle of the application. The Android system may kill your activity or trigger a configuration change which also will restart your activity.You also need to handle open dialogs, as dialogs are always connected to the activity which created them. In case the activity gets restarted and you access an existing dialog you receive an "View not attached to window manager" exception.
To save an object your can use the method
onRetainNonConfigurationInstance()
method. This method allows to save one object if the activity will be
soon restarted.
To retrieve this object you can use the
getLastNonConfigurationInstance()
method. This way can you can save an object, e.g. a running thread,
even if the activity is restarted.
getLastNonConfigurationInstance()
returns null if the Activity is started
the first time or if it has been finished via the finish() method.
If more then one object should be saved then you can implement the class "Application". This class can be used to access object which should be cross activities or available for the whole application lifecycle. In the onCreate() and onTerminate() you can create / destroy the object and make them available via public fields or getters. To use your application class assign the classname to the android:name attribute of your application.
<application android:icon="@drawable/icon" android:label="@string/app_name"
        android:name="MyApplicationClass">
         <activity android:name=".ThreadsLifecycleActivity"
                android:label="@string/app_name">
                 <intent-filter>
                        <action android:name="android.intent.action.MAIN" />
                        <category android:name="android.intent.category.LAUNCHER" />
                </intent-filter>
        </activity>
</application>
You can acess the Application via the getApplication() method in your activity.
4. Tutorial: Handler
In this example we use theHandler
class to update a ProgressBar view in a
background Thread.
Create a new Android project called "de.vogella.android.handler" with the
Activity
"ProgressTestActivity". Create the following layout
"main.xml". This layout contains the ProgressBar and sets
its appearance via a style.
<?xml version="1.0" encoding="utf-8"?>
<LinearLayout xmlns:android="http://schemas.android.com/apk/res/android"
    android:layout_width="fill_parent"
    android:layout_height="fill_parent"
    android:orientation="vertical" >

    <ProgressBar
        android:id="@+id/progressBar1"
        style="?android:attr/progressBarStyleHorizontal"
        android:layout_width="match_parent"
        android:layout_height="wrap_content"
        android:indeterminate="false"
        android:max="10"
        android:padding="4dip" >
    </ProgressBar>

    <Button
        android:id="@+id/button1"
        android:layout_width="wrap_content"
        android:layout_height="wrap_content"
        android:onClick="startProgress"
        android:text="Start Progress" >
    </Button>

</LinearLayout>
Change your
Activity to the following:
package de.vogella.android.handler;

import android.app.Activity;
import android.os.Bundle;
import android.os.Handler;
import android.view.View;
import android.widget.ProgressBar;

public class ProgressTestActivity extends Activity {
        private Handler handler;
        private ProgressBar progress;


/** Called when the activity is first created. */

        @Override
        public void onCreate(Bundle savedInstanceState) {
                super.onCreate(savedInstanceState);
                setContentView(R.layout.main);
                progress = (ProgressBar) findViewById(R.id.progressBar1);
                handler = new Handler();
        }

        public void startProgress(View view) {
                // Do something long
                Runnable runnable = new Runnable() {
                        @Override
                        public void run() {
                                for (int i = 0; i <= 10; i++) {
                                        final int value = i;
                                        try {
                                                Thread.sleep(2000);
                                        } catch (InterruptedException e) {
                                                e.printStackTrace();
                                        }
                                        handler.post(new Runnable() {
                                                @Override
                                                public void run() {
                                                        progress.setProgress(value);
                                                }
                                        });
                                }
                        }
                };
                new Thread(runnable).start();
        }
}
Run your application. Once you press your button the ProgressBar will
get updated from the background thread.
5. Tutorial: AsyncTask
In this example we will use AsyncTask to download the content of a webpage. We use Android HttpClient for this. Create a new Android project "de.vogella.android.asynctask" with the activity "ReadWebpageAsyncTask". Add the permission "android.permission.INTERNET". Create the following layout.<?xml version="1.0" encoding="utf-8"?> <LinearLayout xmlns:android="http://schemas.android.com/apk/res/android" android:layout_width="match_parent" android:layout_height="match_parent" android:orientation="vertical" > <Button android:id="@+id/readWebpage" android:layout_width="match_parent" android:layout_height="wrap_content" android:onClick="readWebpage" android:text="Load Webpage" > </Button> <TextView android:id="@+id/TextView01" android:layout_width="match_parent" android:layout_height="match_parent" android:text="Example Text" > </TextView> </LinearLayout>Change your activity to the following:
package de.vogella.android.asynctask;

import java.io.BufferedReader;
import java.io.InputStream;
import java.io.InputStreamReader;

import org.apache.http.HttpResponse;
import org.apache.http.client.methods.HttpGet;
import org.apache.http.impl.client.DefaultHttpClient;

import android.app.Activity;
import android.os.AsyncTask;
import android.os.Bundle;
import android.view.View;
import android.widget.TextView;

public class ReadWebpageAsyncTask extends Activity {
        private TextView textView;


/** Called when the activity is first created. */

        @Override
        public void onCreate(Bundle savedInstanceState) {
                super.onCreate(savedInstanceState);
                setContentView(R.layout.main);
                textView = (TextView) findViewById(R.id.TextView01);
        }

        private class DownloadWebPageTask extends AsyncTask<String, Void, String> {
                @Override
                protected String doInBackground(String... urls) {
                        String response = "";
                        for (String url : urls) {
                                DefaultHttpClient client = new DefaultHttpClient();
                                HttpGet httpGet = new HttpGet(url);
                                try {
                                        HttpResponse execute = client.execute(httpGet);
                                        InputStream content = execute.getEntity().getContent();

                                        BufferedReader buffer = new BufferedReader(
                                                        new InputStreamReader(content));
                                        String s = "";
                                        while ((s = buffer.readLine()) != null) {
                                                response += s;
                                        }

                                } catch (Exception e) {
                                        e.printStackTrace();
                                }
                        }
                        return response;
                }

                @Override
                protected void onPostExecute(String result) {
                        textView.setText(result);
                }
        }

        public void readWebpage(View view) {
                DownloadWebPageTask task = new DownloadWebPageTask();
                task.execute(new String[] { "http://www.vogella.de" });

        }
}
If you run your application and press your button then the content of
the defined webpage should be read in the background. Once this
process is done your TextView will be updated.
6. Tutorial: Activity lifecycle and Thread
The following example will download an image from the Internet in a thread and displays a dialog until the download is done. We will make sure that the thread is preserved even if the activity is restarted and that the dialog is correctly displayed and closed.For this example create the Android project "de.vogella.android.threadslifecycle" and the Activity "ThreadsLifecycleActivity". Also add the permission to use the Internet to your app. Details for this can found here: Networking with Android.
You should have the following AndroidManifest.xml
<?xml version="1.0" encoding="utf-8"?>
<manifest xmlns:android="http://schemas.android.com/apk/res/android"
    package="de.vogella.android.threadslifecycle"
    android:versionCode="1"
    android:versionName="1.0" >

    <uses-sdk android:minSdkVersion="10" />

    <uses-permission android:name="android.permission.INTERNET" >
    </uses-permission>

    <application
        android:icon="@drawable/icon"
        android:label="@string/app_name" >
        <activity
            android:name=".ThreadsLifecycleActivity"
            android:label="@string/app_name" >
            <intent-filter>
                <action android:name="android.intent.action.MAIN" />

                <category android:name="android.intent.category.LAUNCHER" />
            </intent-filter>
        </activity>
    </application>

</manifest>
Change the layout "main.xml" to the following.
<?xml version="1.0" encoding="utf-8"?>
<LinearLayout xmlns:android="http://schemas.android.com/apk/res/android"
    android:layout_width="fill_parent"
    android:layout_height="fill_parent"
    android:orientation="vertical" >

    <LinearLayout
        android:id="@+id/linearLayout1"
        android:layout_width="match_parent"
        android:layout_height="wrap_content" >

        <Button
            android:layout_width="wrap_content"
            android:layout_height="wrap_content"
            android:onClick="downloadPicture"
            android:text="Click to start download" >
        </Button>

        <Button
            android:layout_width="wrap_content"
            android:layout_height="wrap_content"
            android:onClick="resetPicture"
            android:text="Reset Picture" >
        </Button>
    </LinearLayout>

    <ImageView
        android:id="@+id/imageView1"
        android:layout_width="match_parent"
        android:layout_height="match_parent"
        android:src="@drawable/icon" >
    </ImageView>

</LinearLayout>
Now adjust your activity. In this activity the thread is saved and the dialog is closed if the activity is destroyed.
package de.vogella.android.threadslifecycle;

import java.io.IOException;

import org.apache.http.HttpEntity;
import org.apache.http.HttpResponse;
import org.apache.http.StatusLine;
import org.apache.http.client.HttpClient;
import org.apache.http.client.methods.HttpGet;
import org.apache.http.client.methods.HttpUriRequest;
import org.apache.http.impl.client.DefaultHttpClient;
import org.apache.http.util.EntityUtils;

import android.app.Activity;
import android.app.ProgressDialog;
import android.graphics.Bitmap;
import android.graphics.BitmapFactory;
import android.os.Bundle;
import android.os.Handler;
import android.view.View;
import android.widget.ImageView;

public class ThreadsLifecycleActivity extends Activity {
        // Static so that the thread access the latest attribute
        private static ProgressDialog dialog;
        private static ImageView imageView;
        private static Bitmap downloadBitmap;
        private static Handler handler;
        private Thread downloadThread;


/** Called when the activity is first created. */


        @Override
        public void onCreate(Bundle savedInstanceState) {
                super.onCreate(savedInstanceState);
                setContentView(R.layout.main);
                // Create a handler to update the UI
                handler = new Handler();
                // get the latest imageView after restart of the application
                imageView = (ImageView) findViewById(R.id.imageView1);
                // Did we already download the image?
                if (downloadBitmap != null) {
                        imageView.setImageBitmap(downloadBitmap);
                }
                // Check if the thread is already running
                downloadThread = (Thread) getLastNonConfigurationInstance();
                if (downloadThread != null && downloadThread.isAlive()) {
                        dialog = ProgressDialog.show(this, "Download", "downloading");
                }
        }

        public void resetPicture(View view) {
                if (downloadBitmap != null) {
                        downloadBitmap = null;
                }
                imageView.setImageResource(R.drawable.icon);
        }

        public void downloadPicture(View view) {
                dialog = ProgressDialog.show(this, "Download", "downloading");
                downloadThread = new MyThread();
                downloadThread.start();
        }

        // Save the thread
        @Override
        public Object onRetainNonConfigurationInstance() {
                return downloadThread;
        }

        // dismiss dialog if activity is destroyed
        @Override
        protected void onDestroy() {
                if (dialog != null && dialog.isShowing()) {
                        dialog.dismiss();
                        dialog = null;
                }
                super.onDestroy();
        }

        // Utiliy method to download image from the internet
        static private Bitmap downloadBitmap(String url) throws IOException {
                HttpUriRequest request = new HttpGet(url.toString());
                HttpClient httpClient = new DefaultHttpClient();
                HttpResponse response = httpClient.execute(request);

                StatusLine statusLine = response.getStatusLine();
                int statusCode = statusLine.getStatusCode();
                if (statusCode == 200) {
                        HttpEntity entity = response.getEntity();
                        byte[] bytes = EntityUtils.toByteArray(entity);

                        Bitmap bitmap = BitmapFactory.decodeByteArray(bytes, 0,
                                        bytes.length);
                        return bitmap;
                } else {
                        throw new IOException("Download failed, HTTP response code "
                                        + statusCode + " - " + statusLine.getReasonPhrase());
                }
        }

        static public class MyThread extends Thread {
                @Override
                public void run() {
                        try {
                                // Simulate a slow network
                                try {
                                        new Thread().sleep(5000);
                                } catch (InterruptedException e) {
                                        e.printStackTrace();
                                }
                                downloadBitmap = downloadBitmap("http://www.vogella.de/img/lars/LarsVogelArticle7.png");
                                handler.post(new MyRunnable());
                        } catch (IOException e) {
                                e.printStackTrace();
                        } finally {

                        }
                }
        }

        static public class MyRunnable implements Runnable {
                public void run() {
                        imageView.setImageBitmap(downloadBitmap);
                        dialog.dismiss();
                }
        }

}
Run your application and press the button to start a download. You
can test the correct lifecycle behavior in the emulator via pressing
"CNTR+F11" as this changes the orientation.
It is important to note that the Thread is a static inner class. It is important to use a static inner class for your background process because otherwise the inner class will contain a reference to the class in which is was created. As the thread is passed to the new instance of your activity this would create a memory leak as the old activity would still be referred to by the Thread.
7. StrictMode
StrictMode is available as of API 9, therefore make sure to use Android 2.3.3. As discussed you should avoid performing long running operations on the UI thread. This includes file and network access. It is sometimes difficult to remember to make all the right things in your application during development. That is were StrictMode comes in. It allows to setup policies in your application to avoid doing incorrect things. For example the following setup will crash your application if it violates some of the Android policies. StrictMode should only be used during development and not in your live application.Create the project called "de.vogella.android.strictmode" with the
Activity called
"TestStrictMode". The following will set strict rules for
your application. As the activity violates these settings you
application will crash.
package de.vogella.android.strictmode;

import java.io.BufferedWriter;
import java.io.OutputStreamWriter;

import android.app.Activity;
import android.os.Bundle;
import android.os.StrictMode;

public class TestStrictMode extends Activity {
        @Override
        public void onCreate(Bundle savedInstanceState) {
                StrictMode.setThreadPolicy(new StrictMode.ThreadPolicy.Builder()
                                .detectAll().penaltyLog().penaltyDeath().build());
                StrictMode.setVmPolicy(new StrictMode.VmPolicy.Builder().detectAll()
                                .penaltyLog().penaltyDeath().build());

                super.onCreate(savedInstanceState);
                setContentView(R.layout.main);
                super.onCreate(savedInstanceState);
                setContentView(R.layout.main);
                String eol = System.getProperty("line.separator");
                try {
                        BufferedWriter writer = new BufferedWriter(new OutputStreamWriter(
                                        openFileOutput("myfile", MODE_WORLD_WRITEABLE)));
                        writer.write("This is a test1." + eol);
                        writer.write("This is a test2." + eol);
                        writer.write("This is a test3." + eol);
                        writer.write("This is a test4." + eol);
                        writer.write("This is a test5." + eol);
                        writer.close();
                } catch (Exception e) {
                        e.printStackTrace();
                }
        }
}
8. TraceView and Memory Dump
Traceview is a graphical viewer to see logs created by an Android application. Via Traceview you can find errors in your application and measure its performance.8.1. Using TraceView in Eclipse
Eclipse supports tracing directly in the DDMS perspective. In the devices view select your application process and select "Start Method Profiling".Use your application and re-press the same button to stop profiling. This will open a new editor which shows you the result of traceview.
You can zoom into the graphic to get more details.
8.2. Using TraceView from the command line
To start tracing some code put the following code snippet around it.android.os.Debug.startMethodTracing("yourstring"); // ... your code is here android.os.Debug.stopMethodTracing();The parameter "yourstring" tells the system that it should store the data under "/sdcard/yourstring.trace". To save data on the sdcard your application needs the WRITE_EXTERNAL_STORAGE permission. After running your application you can use Traceview via adb .
adb pull /sdcard/yourstring.trace
traceview yourstring
This will start Traceview which allow you to analyse your performance
data via a graphical way. The DDMS view has also a trace button
available. This will trace the running application and does not
require an additional authorization.
8.3. Memory Dumps
You can create a memory snapshot and analyse it with the Eclipse Memory Analyzer.The UI thread
When an application is launched, the system creates a thread called "main" for the application. The main thread, also called the UI thread, is very important because it is in charge of dispatching the events to the appropriate widgets, including drawing events. It is also the thread where your application interacts with running components of the Android UI toolkit.For instance, if you touch the a button on screen, the UI thread dispatches the touch event to the widget, which in turn sets its pressed state and posts an invalidate request to the event queue. The UI thread dequeues the request and notifies the widget to redraw itself.
This single-thread model can yield poor performance unless your application is implemented properly. Specifically, if everything is happening in a single thread, performing long operations such as network access or database queries on the UI thread will block the whole user interface. No event can be dispatched, including drawing events, while the long operation is underway. From the user's perspective, the application appears hung. Even worse, if the UI thread is blocked for more than a few seconds (about 5 seconds currently) the user is presented with the infamous "application not responding" (ANR) dialog.
If you want to see how bad this can look, write a simple application with a button that invokes
Thread.sleep(2000)
in its OnClickListener.
The button will remain in its pressed state for about 2 seconds
before going back to its normal state. When this happens, it is very
easy for the user to perceive the application as slow.To summarize, it's vital to the responsiveness of your application's UI to keep the UI thread unblocked. If you have long operations to perform, you should make sure to do them in extra threads (background or worker threads).
Here's an example of a click listener downloading an image over the network and displaying it in an ImageView:
public void onClick(View v) {
  new Thread(new Runnable() {
    public void run() {
      Bitmap b = loadImageFromNetwork();
      mImageView.setImageBitmap(b);
    }
  }).start();
}
At first, this code seems to be a good solution to your problem, as
it does not block the UI thread. Unfortunately, it violates the
single-threaded model for the UI: the Android UI toolkit is not
thread-safe and must always be manipulated on the UI thread. In
this piece of code above, the ImageView
is manipulated on a worker thread, which can cause really weird
problems. Tracking down and fixing such bugs can be difficult and
time-consuming.Android offers several ways to access the UI thread from other threads. You may already be familiar with some of them but here is a comprehensive list:
You can use any of these classes and methods to correct the previous code example:
public void onClick(View v) {
  new Thread(new Runnable() {
    public void run() {
      final Bitmap b = loadImageFromNetwork();
      mImageView.post(new Runnable() {
        public void run() {
          mImageView.setImageBitmap(b);
        }
      });
    }
  }).start();
}
Unfortunately, these classes and methods could also tend to make your
code more complicated and more difficult to read. It becomes even
worse when your implement complex operations that require frequent UI
updates.
To remedy this problem, Android 1.5 and later platforms offer a utility class called
AsyncTask,
that simplifies the creation of long-running tasks that need to
communicate with the user interface.An
AsyncTask equivalent is also
available for applications that will run on Android 1.0 and 1.1. The
name of the class is UserTask.
It offers the exact same API and all you have to do is copy its
source code in your application.The goal of
AsyncTask is to take care
of thread management for you. Our previous example can easily be
rewritten with AsyncTask:public void onClick(View v) {
new DownloadImageTask().execute("http://example.com/image.png");
}
private class DownloadImageTask extends AsyncTask<String, Void, Bitmap> {
protected Bitmap doInBackground(String... urls) {
return loadImageFromNetwork(urls[0]);
}
protected void onPostExecute(Bitmap result) {
mImageView.setImageBitmap(result);
}
}
As you can see, AsyncTask must
be used by subclassing it. It is also very important to remember that
an AsyncTask instance has to be created
on the UI thread and can be executed only once. You can read the
AsyncTask
documentation for a full understanding on how to use this class,
but here is a quick overview of how it works:- You can specify the type, using generics, of the parameters, the progress values and the final value of the task
- The method doInBackground() executes automatically on a worker thread
- The value returned by doInBackground() is sent to onPostExecute()
- You can call publishProgress() at anytime in doInBackground() to execute onProgressUpdate() on the UI thread
- You can cancel the task at any time, from any thread
Regardless of whether or not you use AsyncTask, always remember these two rules about the single thread model:
- Do not block the UI thread, and
- Make sure that you access the Android UI toolkit only
on the UI thread.
AsyncTask just makes it easier to do
both of these things.Introduction to fragments
Fragments
can be called as a small portion within an activity interface or
simply a subactivity. Therefore, a user can include multiple
fragments inside a single activity.
The
concept of fragments is more relevant in the case of tablets. Unlike
smartphone interfaces, tablet computers are more wide. Therefore,
more space can be utilized while developing applications for
tablets.
An
example for such a view is; Consider a page that holds the names of
available books in an e-reader website at the left side of the
window. While clicking on each books, the right side of the window
pane will display the contents of the particular book. Such a view
cannot be integrated inside a smartphone UI. Therefore, fragments
are introduced from HoneyComb onwards. ie, Android 3.0 version,
mostly used in tablets.
Features
of a fragment:
Ø
can use multiple fragments
in a single activity
Ø
can reuse fragments in
different activities
Ø
fragment has its own
lifecycle
Ø
it can receive its own
inputs
Ø
fragments can be added or
removed while the activity is live
Ø
but, if the host activity is
destroyed or paused, fragments too got affected
Sample
application that helps in understanding the concept of fragments in
Android is given below.
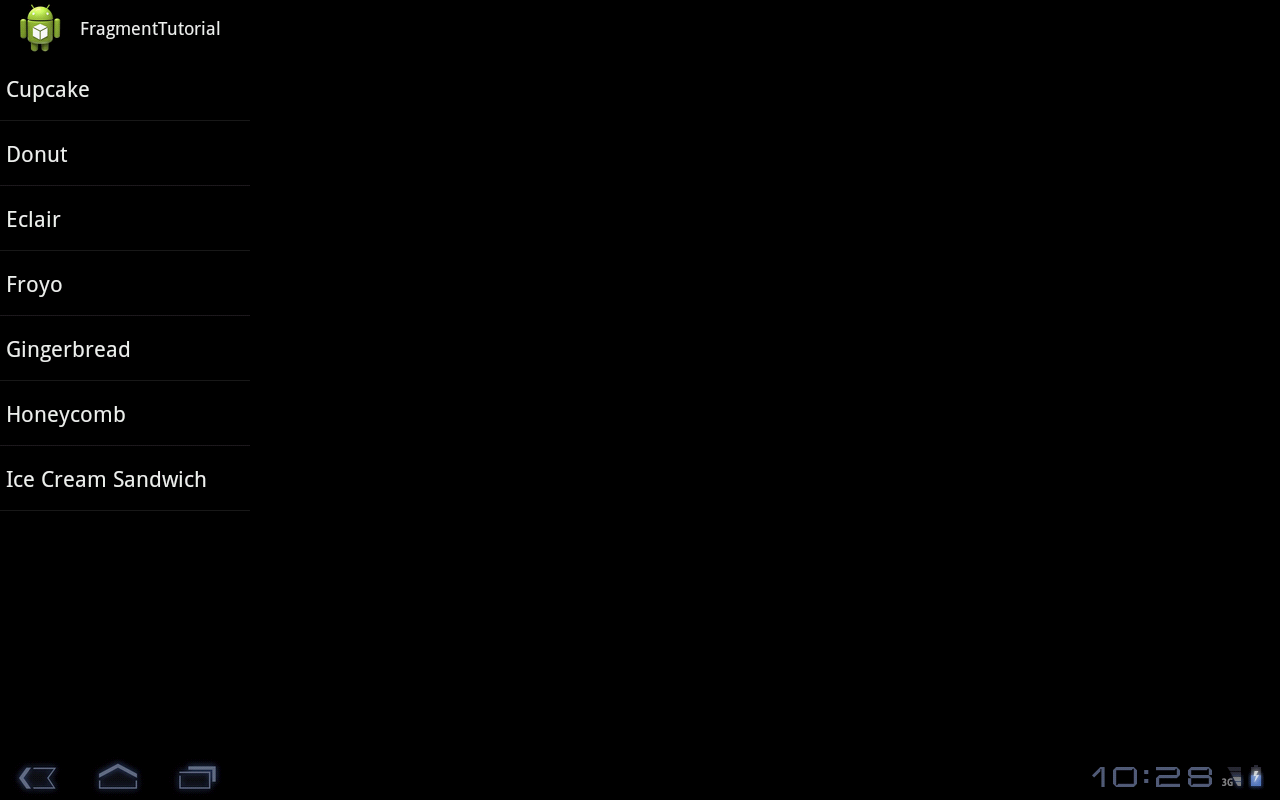
Start
with a new project with target version as Android 3.0 and create the
main activity class named FragmentTutorialActivity.class.
Insert
the code into that class:
package
com.febi.tut;
import
android.app.Activity;
import
android.app.Fragment;
import
android.app.FragmentTransaction;
import
android.os.Bundle;
import
android.view.View;
import
android.widget.AdapterView;
import
android.widget.AdapterView.OnItemClickListener;
import
android.widget.ArrayAdapter;
import
android.widget.ListView;
public
class FragmentTutorialActivity extends Activity implements
OnItemClickListener {
/**
Called when the activity is first created. */
@Override
public
void onCreate(Bundle savedInstanceState) {
super.onCreate(savedInstanceState);
setContentView(R.layout.main);
ListView
l = (ListView) findViewById(R.id.number_list);
ArrayAdapter<String>
androidVersions = new ArrayAdapter<String>(getApplicationContext(),
android.R.layout.simple_list_item_1,
new String[]{"Cupcake",
"Donut",
"Eclair","Froyo","Gingerbread","Honeycomb","Ice
Cream Sandwich"});
l.setAdapter(androidVersions);
l.setOnItemClickListener(this);
}
/**
*
Called when a version name gets clicked
*/
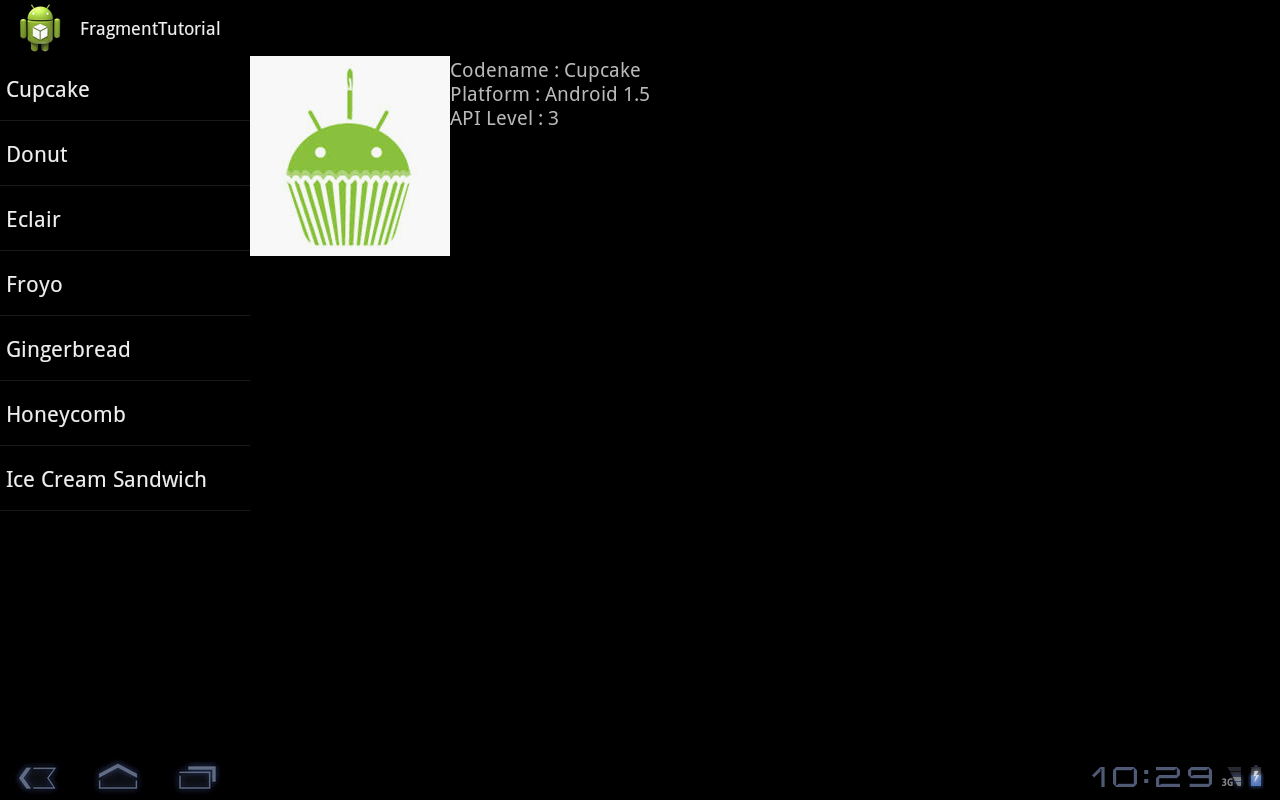
public
void onItemClick(AdapterView<?> parent, View view, int
position, long id) {
/*Calling
the fragment class that decides the view to be displayed in the
fragment*/
Fragment
f = new TestFragment(position+1);
FragmentTransaction
ft = getFragmentManager().beginTransaction();
ft.replace(R.id.the_frag,
f);
ft.setTransition(FragmentTransaction.TRANSIT_FRAGMENT_FADE);
ft.addToBackStack(null);
ft.commit();
}
}
Now
create a new class named TestFragment.class and insert the
code into the file.
package
com.febi.tut;
import
java.io.ByteArrayOutputStream;
import
java.io.IOException;
import
java.io.InputStream;
import
android.app.ActionBar.LayoutParams;
import
android.app.Fragment;
import
android.content.Context;
import
android.os.Bundle;
import
android.view.LayoutInflater;
import
android.view.View;
import
android.view.ViewGroup;
import
android.widget.ImageView;
import
android.widget.LinearLayout;
import
android.widget.TextView;
public
class TestFragment extends Fragment {
private
int version;
public
TestFragment() {
}
/**
*
Constructor for being created explicitly
*/
public
TestFragment(int position) {
this.version
= position;
}
/**
*
If we are being created with saved state, restore our state
*/
@Override
public
void onCreate(Bundle saved) {
super.onCreate(saved);
if
(null != saved) {
version
= saved.getInt("version");
}
}
/**
*
Save the Android version to be displayed
*/
@Override
public
void onSaveInstanceState(Bundle toSave) {
toSave.putInt("version",
version);
}
/**
*
Make a grid to view the version image and details
*/
@Override
public
View onCreateView(LayoutInflater inflater, ViewGroup container,
Bundle saved) {
Context
c = getActivity().getApplicationContext();
LinearLayout
l = new LinearLayout(c);
LayoutParams
params = new LayoutParams(LayoutParams.WRAP_CONTENT,
LayoutParams.MATCH_PARENT, 0);
l.setLayoutParams(params);
ImageView
i = new ImageView(c);
TextView
t=new TextView(c);
t.setTextSize(20);
switch(version){
case
1:
i.setImageResource(R.drawable.cupcake);
t.setText(readTxt("cupcake"));
break;
case
2:
i.setImageResource(R.drawable.donut);
t.setText(readTxt("donut"));
break;
case
3:
i.setImageResource(R.drawable.eclair);
t.setText(readTxt("eclair"));
break;
case
4:
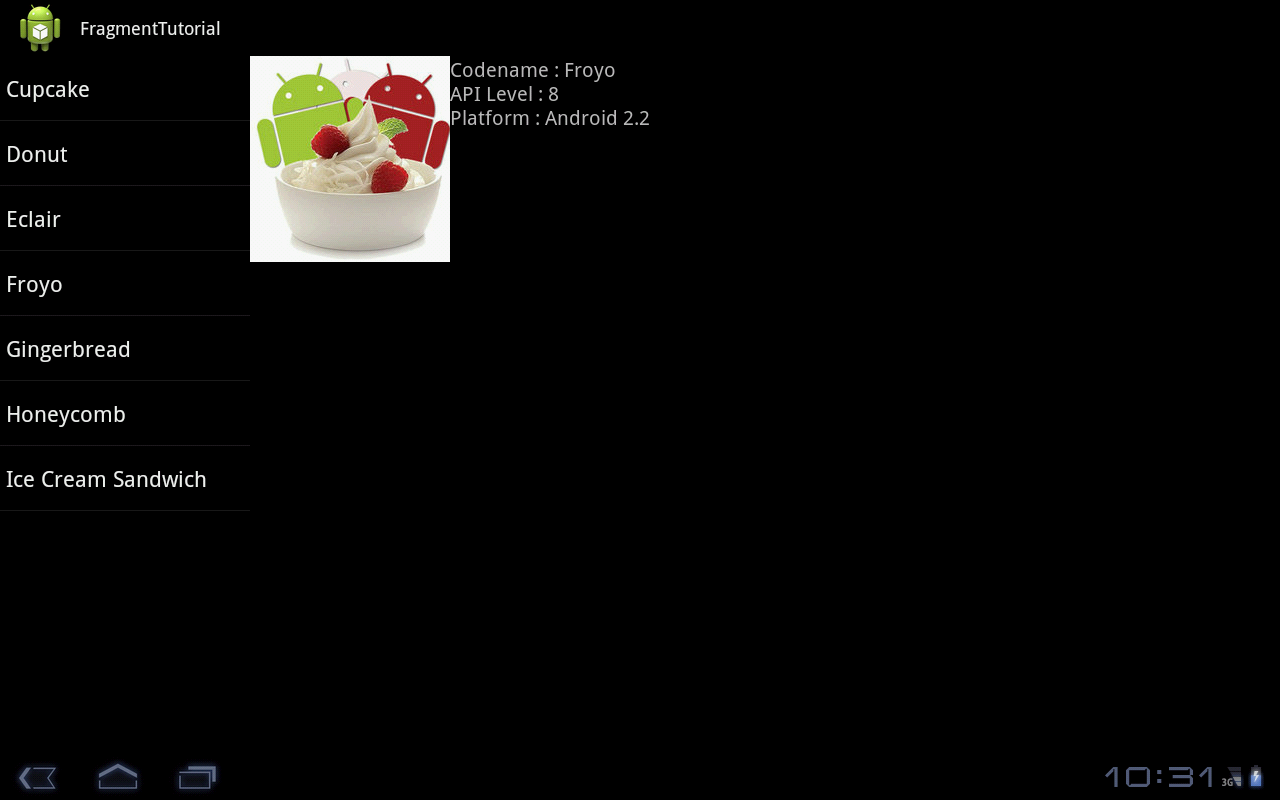
i.setImageResource(R.drawable.froyo);
t.setText(readTxt("froyo"));
break;
case
5:
i.setImageResource(R.drawable.gingerbread);
t.setText(readTxt("ginger"));
break;
case
6:
i.setImageResource(R.drawable.honeycomb);
t.setText(readTxt("honey"));
break;
case
7:
i.setImageResource(R.drawable.icecream);
t.setText(readTxt("ice"));
break;
}
l.addView(i);
l.addView(t);
return
l;
}
private
String readTxt(String version){
int
id = 0;
if(version.equals("cupcake"))
{
id=R.raw.cupcake;
}else
if(version.equals("donut"))
{
id=R.raw.donut;
}
else
if(version.equals("eclair"))
{
id=R.raw.eclair;
}
else
if(version.equals("froyo"))
{
id=R.raw.froyo;
}
else
if(version.equals("ginger"))
{
id=R.raw.ginger;
}
else
if(version.equals("honey"))
{
id=R.raw.honey;
}
else
if(version.equals("ice"))
{
id=R.raw.icecream;
}
InputStreaminputStream=getResources().openRawResource(id);
ByteArrayOutputStream
byteArrayOutputStream = new ByteArrayOutputStream();
int
i;
try
{
i
= inputStream.read();
while
(i != -1)
{
byteArrayOutputStream.write(i);
i
= inputStream.read();
}
inputStream.close();
}
catch (IOException e) {
//
TODO Auto-generated catch block
e.printStackTrace();
}
return
byteArrayOutputStream.toString();
}
}
Now
comes the main xml file. Copy the code below to that file
too.
<?xml
version="1.0" encoding="utf-8"?>
<LinearLayout
xmlns:android="http://schemas.android.com/apk/res/android"
android:orientation="horizontal"
android:layout_width="match_parent"
android:layout_height="match_parent"
android:id="@+id/frags">
<ListView
android:id="@+id/number_list"
android:layout_width="250dip"
android:layout_height="match_parent"
/>
<fragment
class="com.febi.tut.TestFragment"
android:id="@+id/the_frag"
android:layout_width="match_parent"
android:layout_height="match_parent"
/>
</LinearLayout>
Add
the descriptions for each Android version in a text file and store
those text files inside res/raw folder in your project.
A
sample text file;
Cupcake.txt
Codename
: Cupcake
Platform
: Android 1.5
API
Level : 3
Mention
the first activity class inside the Manifest file and then run the
program.
Output
of the program looks like this:

No comments:
Post a Comment